The City’s recommended approach to stormwater management on private properties is capture and infiltration. This approach provides the best benefit for both our infrastructure and the environment. Infiltrating rainwater is the best option to recreate the natural process that would occur when our watersheds were forested. This decreases peak flows during rainy days, and increases low flows following a rain storm.
However, infiltration is not always possible or practical on every property, due to high groundwater conditions, poor soil infiltration, presence of bedrock, or proximity to steep ravine slopes. In these cases, alternate approaches to managing stormwater are possible. Recommended and optional stormwater management tools are listed below.
Recommended Stormwater Tools
The following are recommended tools in the order of preference for meeting the Stormwater Management Plan submission requirements.
In addition to these tools you should slope all hard surfaces, such as patios and pathways, to soft landscape areas (e.g. lawns and planting beds). The recommended slope for hard surfaces is 2%, which equals a 2cm change in height over a 1m horizontal distance.
Infiltration Chambers
 Infiltration chambers are below-ground containers with permeable bottoms. They are designed to temporarily hold stormwater and allow it to slowly seep into the ground. They can be located below lawn, planting beds, pathways, patios, or parking pads. Infiltration chambers are the preferred method for stormwater management for one and two dwelling properties in the City.
Infiltration chambers are commonly made of large diameter plastic pipes or other shapes, and are available in various sizes to fit your space. The chambers need to be at least 5 m away from foundations (BC Building Code requirement.
Infiltration chambers are well suited to receive rain from rooftops, and since the facility is located underground it does not use yard space that could be for other purposes. As per the Building Code, roof water that is collected in a shallow sump near the house is directed into a second flow-splitting sump to preferentially direct rainwater to the infiltration chamber before overflowing to the stormwater system. This flow-splitting sump is a very important component for the infiltration chamber to ensure safe operation and free drainage. Overflow from the chamber is directed into the City’s storm sewer system.
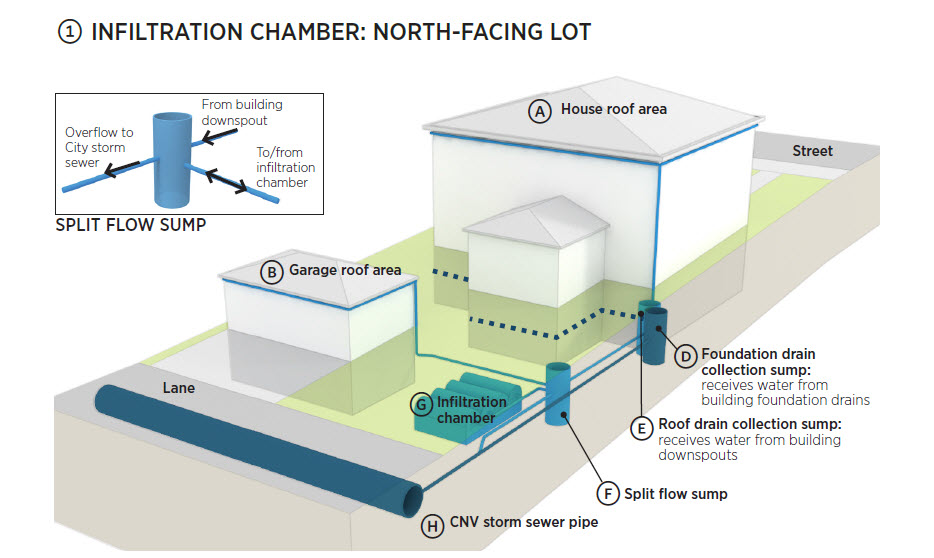
Infiltration Chamber Key Design Features
- Infiltration chambers must be 5m away from foundations to meet section 9.14.5.3 of the British Columbia Building Code
- Infiltration chambers should be a minimum of 1 m (3’) from side yards and should located away from drained retaining walls on property side boundaries
- A low permeability liner (e.g. LDPE, PVC, etc) should be placed between the chamber and the house to better limit flow towards the foundation drains
- Any foundation drains shall bypass the infiltration chamber and flow directly to the storm sewer
- Infiltration chambers should incorporate at least one inspection point to ensure good working condition and future maintenance
The City plan review process will always consider the possibility of an infiltration chamber prior to considering other management tools. Refer to the flowchart (link) to see which tool is most suitable for your property or go to the infiltration chamber worksheet (link).
Typical Infiltration Chamber Layout
The illustrations below provide an example of how drainage pipes and an infiltration chamber could be laid out on a typical south-facing lot and a typical north-facing lot. In the north-facing lot the infiltration chamber is in the backyard, as that will typically be the low point of the site. Likewise, in the south-facing lot the infiltration chamber will typically be in the front yard. The circled letters correspond to different parts of the worksheet.
Infiltration Chamber Indicative Design Worksheet
A design worksheet has been prepared to assist in preparation of the infiltration chamber design. This design provides a diagram of key design components based on a typical layout of a stormwater chamber system and a nominal chamber size for a full sized house and garage in the City.
There are a variety of infiltration chamber products available, links to the most commonly used products are provided below.
City Resources
Product Links
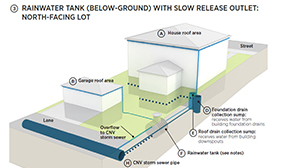
Rainwater Tanks with Infiltration Chambers
 If space is not adequate for a full-sized infiltration chamber, applicants can use rainwater tanks with smaller infiltration chambers. This allows the primary storage of rainwater closer to the home.
This is a more involved solution and may be practical where the site does not have access to a storm sewer (i.e. unserviced property), is constrained, or where the infiltration rate is poor.
These systems typically include an underground or aboveground rainwater tank. The rainwater tank should have the ability to drain slowly, overflow to the infiltration chamber, and eventually overflow to the storm sewer. The rainwater tank could possibly replace the rainwater sump at the building edge, and one of the other stormwater tools (i.e. absorbent soil or a raingarden) could be used in conjunction with the rainwater tank.

Rainwater tanks are available in a variety of sizes and shapes and can even be hidden below decks or within walls. Above ground rainwater tanks provide the benefit of easy access for inspection and maintenance and could be a benefit for very flat sites.
Devices are available to filter the rainwater before it goes into your tank, and to keep your tank free from debris and mosquitoes. The tank is designed to slowly drain into an underground infiltration chamber. In the summer you can keep the valve closed and use the captured rainwater for irrigation. Stormwater harvesting and re-use is regulated by Vancouver Coastal Health and there guidelines limit the use of harvested rainwater for sub-surface “soaking” irrigation applications.
Rainwater Tank & Infiltration Chamber Design
A design worksheet has been prepared to assist in preparation of the design. This design provides a checklist of key design components based on a typical layout of a tank and infiltration chamber system and a nominal chamber size for a full-sized house and garage in the City. Additional design tools are available for lots on both the north and south sides of the a typical City street, see links below.
The City recommends that applicants work with knowledgeable, experienced contractors for this type of installation, and that a design professional be used.
There are a variety of rainwater tanks and infiltration chamber products available; links to the most commonly used products are provided below.
City Resources
Product Links
Rainwater Tanks with Slow-Release Valves
 If there isn’t enough space for an infiltration chamber of any size, applicants can use rainwater tanks with slow-release valves. This allows the rainwater tank to temporarily hold stormwater and then slowly release it into a suitable area.
For sites where infiltration is not possible due to site conditions (e.g. very poor infiltration soils, slope stability issues), or to insufficient space to achieve the 5 m setback from basement foundations, a slow release rainwater tank should be used. A rainwater tank is a solid, watertight vessel that includes a small outlet and a full sized overflow that would be conveyed to the storm sewer.
Rainwater tanks could be above or below ground tanks.

Underground tanks are usually larger and would not occupy any yard space. To capture a greater volume of water, several rainwater tanks can be linked together. The key components of a rainwater tank system include:
- tank volume (6500 litre capacity for a 250 m2 or 2,700 ft2 of house and garage area)
- inspection hatch
- small diameter (10 mm diameter or smaller) slow release outlet (ideally floating intake)
- overflow to storm sewer
These systems can be purchased as complete packages, and additional filter accessories can be added to reduce maintenance or improve water quality. A key part of the rainwater tank is for the use of a small diameter outlet, which must be 10 mm or less to achieve the environmental goals associated with stormwater management.
The slow-release valve allows the tank to slowly drain into the storm sewer, providing most of the same benefits as infiltration. This frees up space in the tank for the next rain event. In the summer you can keep the valve closed and use the captured rainwater for irrigation. Vancouver Coastal Health can provide additional information for best practices for use of harvested rain for irrigation.
There are some complete package solutions, or slow release tanks can be constructed from component products. Some applications use the practical approach of sealed larger diameter piping as the storage tank.
City Resources
Product Links
Optional Stormwater Tools
These tools are intended to complement the Recommended tools. Ordinarily they cannot be used by themselves for achieving the Stormwater Management Plan requirements, and may have some challenges associated with meeting the City Building Bylaw. These systems can also require more regular maintenance to ensure good operation.
Absorbent Landscapes
 To maximize the rainwater capture of your property, the concept of absorbent landscapes has been developed. Providing a deep layer of organic soil can be a simple way of reducing stormwater runoff, while increasing the health of your plants.
Forested land naturally manages rain, where trees first catch rain and then the loose woody soil then absorbs the remaining rain. An absorbent landscape is where a thick layer of sandy-organic soil is applied over top of the natural mineral soils on your property. Local studies have shown that a depth of 450 mm (18") of soil is very effective at catching and managing the normal rain that is shed from roofs, patios, and driveways.

Absorbent Soil Types
Absorbent soil is a blend of organic soil, sand, and compost that will infiltrate and hold more water than organic rich soils, and slow down the rainfall runoff than more than gravelly soils.
For lawn areas, typical “Turf Blend” soils with an organic content of 8% are ideal for good infiltration and water retention. If the soil is obtained locally (e.g. North Vancouver Transfer Station – Harvest Power soil outlet), some organic soil amender should be added to increase the organic content from about 5% to 8%.
For garden areas, “Garden Blend” soil should have an organic content of 15%, and some organic soil amender could be added to the local Harvest Power product to ensure the 15% organic content.
Thick layers of absorbent soil manage the rainfall that falls on them, but could also take stormwater from patio and roof areas. This could include:
- diverting roof water or patio runoff to garden planting beds through a combination of solid and perforated pipe.
- dispersing runoff from impervious surfaces in larger grass areas with solid and perforated pipes.
Simple absorbent soil approaches could cost as low as $2,500 for about 10 to 15m2 of area and would offset other landscaping costs.
City Resources
Rain Gardens
 Rain gardens are a combination of absorbent landscaping and soil infiltration. Providing a deep layer of organic soil can be a simple way of reducing stormwater runoff, while increasing the health of your plants.
These approach provides a garden area in a gentle depression to collect water from impervious areas. The top garden layer of absorbent soil both filters and traps water while supporting a variety of moisture-tolerant plants. All the excess water infiltrates through the organic soil layer to an underlying rock pit to store and further infiltrate water. This is a nice blend of the two approaches to provide a visually appealing and active garden area, as well as providing extra ability to store water.

Rain gardens provide a large degree of flexibility as they can be sited around the yard and close to individual downspouts or separate gardens for the home and garage. However, rain gardens require more space than the infiltration chambers described in the Recommended tools, and would be expected to range from about 10m (100ft2) to 36m2 (390ft2) for a range of roof areas and soil infiltration capacities. The Tool Sheet linked below provides a range of sizes.
Rain Garden Key Design Features
- Rain gardens should be set back from deep foundations but are not regulated by the Building Code; 3m (10’) is a suggested setback.
- Rain gardens should be a minimum of 1m (3’) from side yards and should located away from drained retaining walls on property side boundaries.
- Rain gardens need an overflow and an underdrain is also recommended as shown in the typical section.
- Any foundation drains shall bypass the infiltration chamber and flow directly to the storm sewer.
Simple rain gardens could cost as low as $2,500 and would offset other landscaping costs. For sites where the groundwater is high or the depth of good infiltrating soil is small, a rain garden provides a very shallow approach to rainwater management.
While rain gardens can manage all of the rainwater from your site, they require more space, and will need much more ongoing plant maintenance. The Recommended rainwater management approaches are all underground and would allow use of the surface area, in contrast to rain gardens.
City Resources
Roof-Based Detention
 Roof-based rainwater detention is a very effective way to manage rainwater, as it works directly where the rain lands, and one square metre of area only manages one square metre of rain. There are a variety of roof-based detention approaches that may or may not include a range of soil, other growing media, and plants. These include:
- Extensive green roofs
- Intensive green roofs
- Semi-Intensive green roofs
- Brown roofs
- Blue roofs
The City recommends seeking professional design expertise for any roof-based detention approach to address the local needs of your design and the Building Code. These are more sophisticated solutions, integrating roof systems, building structural capacity, and the rainwater management component. Historically green roofs have not been supported under the New Home Warranty.
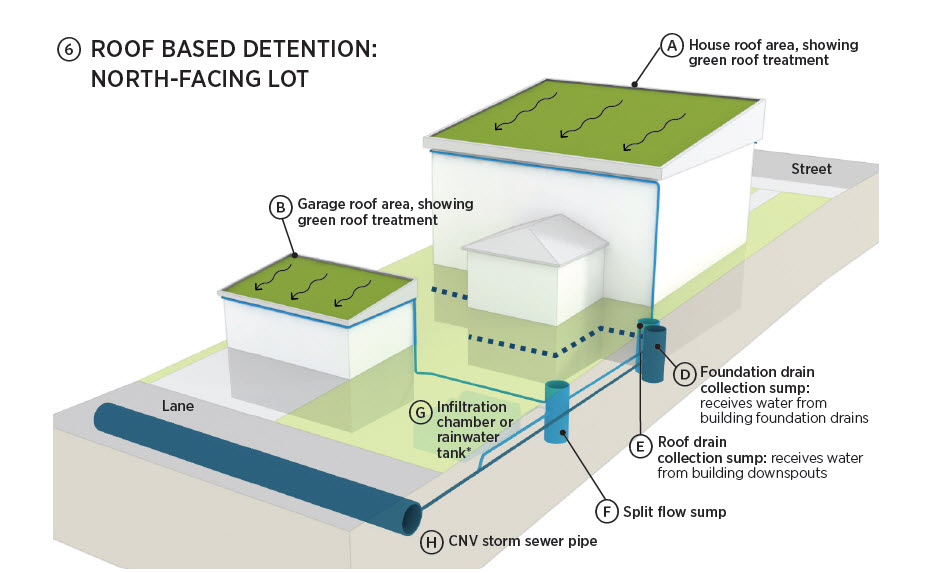
Extensive Green Roofs
Extensive green roofs decrease the impact of roof areas directly by incorporating low vegetative mats over broad roof areas. Extensive green roofs do not need to be flat, and are often built on shallow and even steeper pitched roofs. There has been a large degree of research developed for green roofs that can assist in the design, and there are local specialty contractors that provide installation services.
Intensive Green Roofs
Intensive green roofs are roofs where thicker depths of soil are used on the roof and patio areas, but not over the entire roof area. The thicker soil supports a wider variety of plants, but are heavier, require more maintenance, and allow a wider range of rooftop uses. Intensive green roofs do not provide the same rainwater management benefit as extensive green roofs.
Brown Roofs
Brown roofs are similar to green roofs in that they share many of the same benefits and construction methods. However, when a brown roof is designed, the overriding aim is to encourage biodiversity by providing habitat for a specific species. It is a general misconception that the term “brown roof” describes the colour of the roof. Because brown roofs usually utilize local soil and spoil to provide the substrate for the roof, the roof will often initially be brown in colour. However, over time plant species will grow over this substrate and the end result will be a green-coloured roof – albeit one that nature has had a large hand in “designing.” Brown roofs are a concept that was developed in Europe, and there is less local experience with this concept in North America.
Blue Roofs
A blue roof is a roof design that is explicitly intended to store water, typically rainfall. Blue roofs that are used for temporary rooftop storage can be classified as "active" or "passive" depending on the types of control devices used to regulate drainage of water from the roof. Blue roofs are typically used for larger commercial, industrial, and institutional developments and are required by City under the Subdivision and Development Control Bylaw for all flat roofs. Blue roofs are not new and have been in use in the Lower Mainland for many years. In addition to rainwater management, blue roofs are effective at moderating temperature in large buildings and increasing energy efficiency. Some innovative recreational blue roofs have integrated rooftop waterplay areas that can also be used for local green roof or other irrigation.
City Resources
Infiltration of rainwater is a practice with a long history, where this was traditionally done in a “soak-away” rock pit or “dry-well”. While rock pits have been used extensively in the past for rainwater management, the City’s current guideline is for the use of infiltration chambers which are pre-engineered plastic chambers that allow storage and infiltration of rainwater. Infiltration chambers are more efficient, allowing about two times more water storage in a smaller space, a greater ability to inspect and maintain the facilities without disturbing the area, and a much longer serviceable life span.
As an applicant you can also propose other innovative approaches for managing stormwater, or use a combination of these tools to meet the target volume for infiltration. As systems become more complex, applicants may choose to hire design professionals (e.g. engineers or landscape architects) or specialty contractors (e.g. licensed plumbers) with specific expertise in this area.
In the event that no rainwater source controls can be achieved on private property, a fee in lieu of the stormwater management works would be applied and dedicated to stormwater management projects on public property. Application of a stormwater management fee will only be considered when no other viable options exist.